[ios] Requesting Location Permissions in iOS
| 첨부 '12' |
|
|---|
Requesting Location Permissions in iOS
When integrated in your app, ARRIVE can provide up-to-the-minute ETAs and other information related to when your users will be arriving at a location. It does this by accessing the location of your users’ smartphone at the right times.
That means your app will need to have access to your user’s location at some point. And since Apple wants to make sure its users have some control of who can access their location, using ARRIVE will require getting permission from your users. So at some point in your user experience, you will need to bring up the topic of location access.
As long as you have a good reason for using location, getting users to allow location access doesn’t have to be too tall of a task, especially if you make the right requests at the right time. Hopefully, this guide can provide a little assistance on how to do that.
To get started, you should know about the two levels of location access available to iOS apps.
Levels of access
iOS apps can support one of two levels of location access.
- While using the app
The app can access the device’s location when the app is in use. This is also known as “when-in-use authorization.” - Always
The app can access the device’s location either when app is in use or in the background.
Note that “while using” and “always” are user-facing terms. In Apple’s developer docs, they are referred to as “when-in-use” and “always”.
Since location tracking works best when it can work in the background, ARRIVE requires location access when your app is running in the background. That means to use ARRIVE with your app, the app must be authorized for always access.
Status indicators
iOS has a couple of ways to let users know when their location is being accessed.
Status bar
When an app is accessing a device’s location, iOS displays a small location status icon in the device’s status bar.

Location icon in status bar when an app is accessing location
Blue bar
Starting with iOS 11, a blue bar is displayed on the top of the screen when an app with while using access is actively tracking the user’s location. The blue bar is visible regardless of which app is in the foreground.
The blue bar is not displayed when an app with always access is tracking the user’s location. ARRIVE requires always access, so the blue bar will not show when tracking trips with ARRIVE.

Location services settings
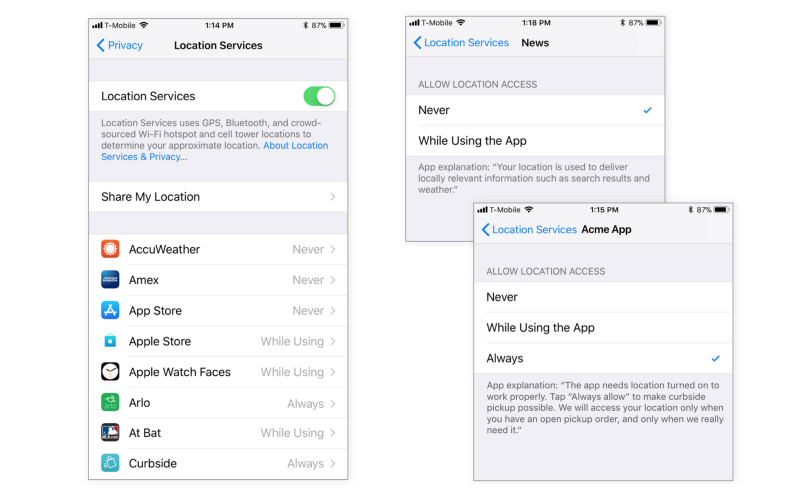
For apps that use Location Services, users can control location access in the iOS settings app under Privacy > Location Services. Location settings for all apps are collected in this one place. These settings can be changed at anytime, but users have to go to the settings app to do this.
- For all apps
One Location Services switch turns location access on or off for all apps. - Per app
Two or three options are available per app depending on access level. Never and While Using the App are always available. If supported by the app, Always will be a third option.
Location permission alerts
The first time your app needs to access a device’s location, iOS will request access for you from within your app. The system does this by showing a location permission alert at a point in the flow determined by the developer. Getting permission this way bypasses the need for the user to change settings in the settings app.
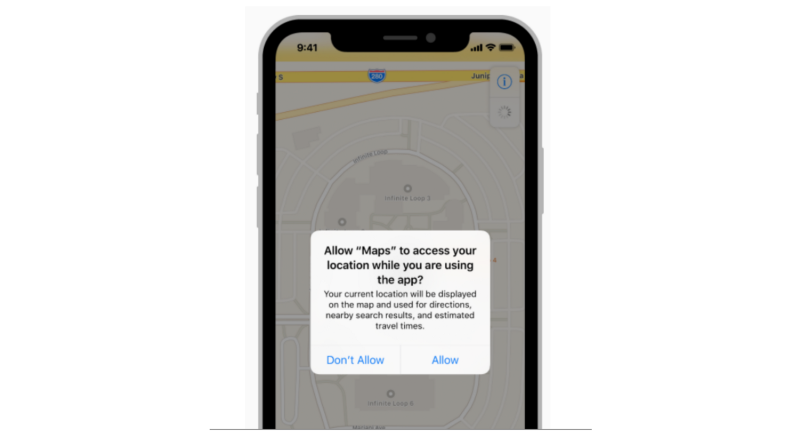
Location request alert (for while using access)
Users have only one chance to respond to these alerts, so you want to make your request at the right time and provide a good reason for it. If the user doesn’t allow access, they’ll need to go to the settings to enable location access. You provide your reason in the form of a usage description.
Usage descriptions
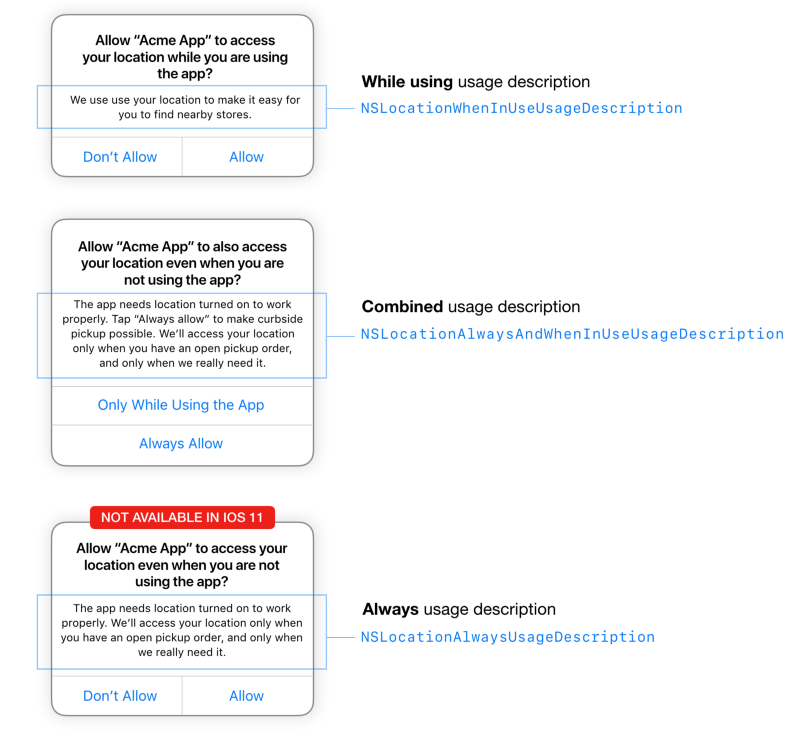
All location permission alerts include a title and a message. The title is provided by iOS. The message below the title is the usage description which is provided by the app developer.

Location request alert
For while using access:
- Regardless of which level of access you need, the developer must provide a usage description for while using access.
For always access:
- The developer must also provide a usage description that combines both always and while using, and
- For iOS 10 users, the developer should also include a usage description for always (but this type of alert is not available in iOS 11).
Writing a usage description
The usage description is a chance to explain why the app needs location access. The description should be short and to the point — just enough to convince the user to tap the right button.
- Explain clearly but concisely why background access is important for the user experience, or tell users they will not get the full experience if they decline.
- When requesting always access, clearly encourage the user to tap “Always Allow” up front and focus the content of your combined message on always.
- Explain that the background location will be used only when needed (for example, when there’s an open order).
Requesting permission
The way you request access permission depends on the level of access you need. If you plan to use ARRIVE, you’ll need to always access to make it work properly. Your strategy for requesting always access should depend on where you need access in your user flow.
Requesting “While using”
If your app doesn’t require background access, you only need one alert. Once you request while using access, you’re done. If the user denies access at that point, location services for that app will be in Never mode until the user goes to settings to turn it on.
Requesting “Always”
In iOS 11, it is not possible to ask for always access without also asking for while using access. There are two approaches to doing this:
- Approach 1: Use two alerts
Request while using access first, followed by a request for always access at a later time - Approach 2: Use one alert
Request while using and always access at the same time
Approach 1: Use two alerts (recommended)
Using two system alerts helps ease the user into always by first requesting while using, which is an easier decision. After having used the app in while using mode, the user will be more likely to allow permission for always when background access is really needed.
For example, your app may need your user’s location to display a map showing nearby locations. You don’t need background access for this, so you can get while using access first, and ask for always access later, at a point where you really need it — like right before you need to start tracking.
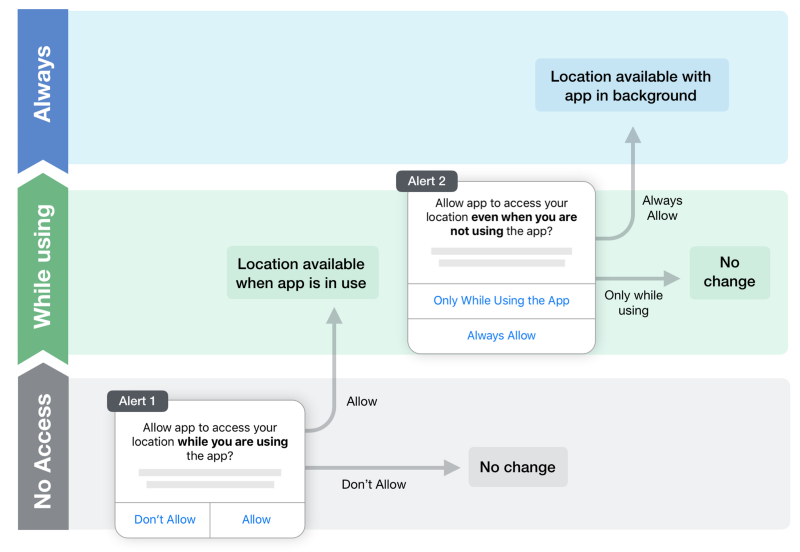
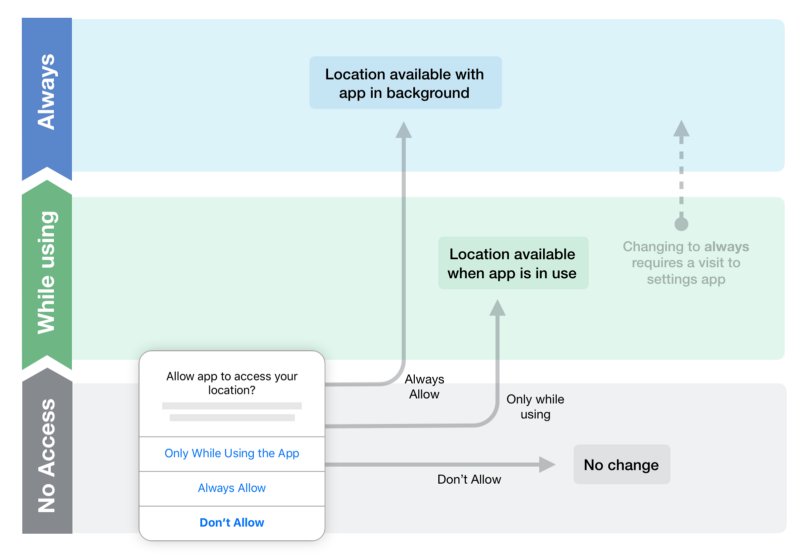
Approach 2: Use one alerts
When using a single alert to request always permission, iOS requires all three options to be offered to the user at once. If while using is chosen, there is no way to request always later.
If the user chooses “Only While Using the App”, turning always on later will require a visit to the settings app. The two alert approach is preferred over this approach because it usually results in a better user experience.
When to request permission
As a general rule, permission should be requested only when it is really needed, and the request should always be made in a relevant context. Users are more likely to allow access when trying to complete a task that clearly needs location access.
- Ask permission at launch only if location will be needed right away.
- Always ask for access in context. Users are more likely to allow access if asked in the context of a relevant task.
- Don’t bombard the user with permission requests for other services at the same time.
- Show a custom “primer” screen or alert before the system alert to increase the effectiveness of the system alert.

Provide useful features at different access levels if possible. Request more access when needed.
Prime the user
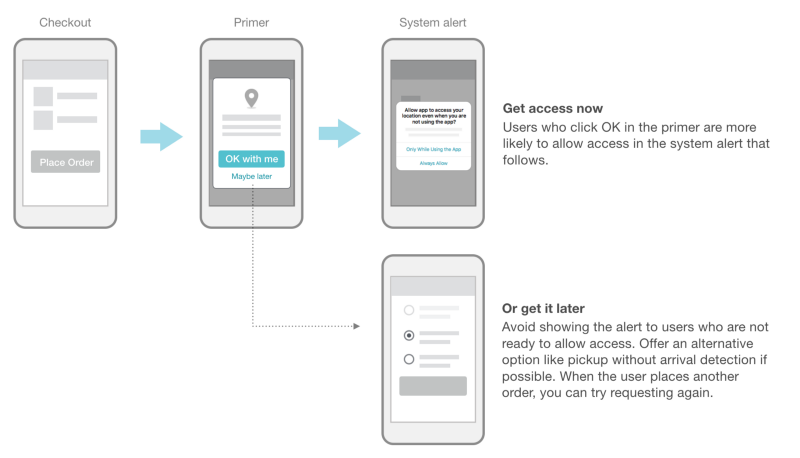
When requesting permission, showing a custom “primer” screen or alert before the system alert can help increase conversions. A primer screen gives you a chance to a) explain the need for location access in your own style without the limitations of a system alert, and b) to gauge whether the user is ready to say yes before showing the alert.
In the primer, explain why it is important to have access to the user’s location, and let the user know that location will be used only when the app really needs it. For example, knowing the user’s location is important for providing the user with a good pickup experience, so let users know that their location will be used only when they have an order to be picked up.
Using a “primer” screen or popup
Since system permission requests can be shown only once, a primer can help gauge the user’s willingness to allow access before showing the system alert. If the user responds negatively to the primer, you don’t have to waste the alert. If possible, proceed without using location for unwilling users. If the user uses the feature again later, you’ll have another chance to request location access.
After users reply positively to the primer, the next thing they should see is the system alert requesting access. The primer content should refer directly to the alert that follows, so they know what to expect and what they should do. Let users know which button to tap on in the alert that follows.
Fitting it into your flow
Where or when in your app’s user experience you decide to ask for permission is going to depend on the nature of your app and how its features work together. The example below is a rough outline showing a 2-alert scenario for a shopping app with curbside pickup. Both alerts in this case make use of primer interstitials.
Your strategy will depend on the nature of your app and the way it works, but if you give the right reason at the right time, you should find that many users are willing to allow permission. Your users have gone to the trouble of installing your app in the first place, so as long as the way you use their location is tied to their reason for installing your app, you should find that people are open to your requests.

[출처] https://medium.com/curbside/requesting-location-permissions-in-ios-9e5a3b814a8b
| 번호 | 분류 | 제목 | 글쓴이 | 날짜 | 조회 수 |
|---|---|---|---|---|---|
| 1129 | Develop |
[Javascript][Ajax] 자바스크립트 강의 산출물
|
hooni | 2019.10.05 | 1824 |
| 1128 | Develop |
[ios] Locale Identifiers
|
hooni | 2018.11.29 | 2811 |
| 1127 | Develop |
[ios] Swift 4 Dictionary 사용하기
|
hooni | 2018.11.29 | 3279 |
| 1126 | Develop | [ios] Swift 4 Singleton inheritance | hooni | 2018.10.31 | 3837 |
| 1125 | Develop | [ios] APNS, Remote Push 사용자가 수신을 동의했는지 확인하기 | hooni | 2018.10.19 | 2335 |
| 1124 | Develop | [ios] APNS, Remote Push 수신 시점에서 앱의 3가지 실행 상태 | hooni | 2018.10.19 | 2101 |
| 1123 | Develop | [ios] Swift 4 String, Date, DateFormatter 예제 | hooni | 2018.10.18 | 3154 |
| 1122 | System/OS |
Mac에서 Node.js 설치하기
|
hooni | 2018.09.28 | 5237 |
| 1121 | System/OS |
서버 확장을 위한 두 가지 방법
|
hooni | 2018.08.29 | 3736 |
| » | Develop |
[ios] Requesting Location Permissions in iOS
|
hooni | 2018.08.18 | 4847 |
| 1119 | Develop |
[PHP] Mac OS에서 PHP 7 설치하기
|
hooni | 2018.05.11 | 6135 |
| 1118 | Develop |
[php] Connect to Firebase Console in Laravel
|
hooni | 2018.05.09 | 4657 |
 서버 확장을 위한 두 가지 방법
 [PHP] Mac OS에서 PHP 7 설치하기