[ios] Start developing your navigation app for CarPlay without enrollment
| 첨부 '2' |
|---|

Rejoice! Apple finally announced navigation app access for CarPlay in the 2018 WWDC keynote.
Starting with iOS 12, we get access to the CarPlay framework, that lets us draw interface components and functionality for our iOS navigation app on the CarPlay screen.
Setup
You would probably want to start developing right away, right? Hold on a second, unfortunately it’s not that easy. Apple requires developers to apply for access to the entitlements that are needed to run a CarPlay navigation app on a real device. That includes an entitlements key for your XCode project and a provisioning profile that allows signing of CarPlay navigation apps.
However, there is a way to start developing your CarPlay navigation app in the XCode simulator while you are waiting for access. This involves adding a key to your app’s AppName.entitlements file. If you haven’t got such a file in your XCode project yet, see step 1 below, if you do, skip to step 2.
Step 1
To quickly add an entitlements file to your project, go to your app’s target settings in XCode, then to the capabilities tab and for example switch on the Homekit capability. This creates a .entitlements file in your project and routes it for your build system to see. You can add the key from step 2 and then switch off the Homekit capability.
Step 2
I stumbled on this key when trying a lot of variants by trial & error, as I heard that the only thing that it took to test CarPlay Audio apps on the simulator was a com.apple.developer.playable-content key in the entitlements file.
The key that worked was to set com.apple.developer.carplay-maps to true in the entitlements file. If you follow the CarPlay navigation documentation and you have that key present, you can use the XCode 10 beta with the CarPlay simulator (in the Simulator app, go to Hardware → External displays → CarPlay) to test your CarPlay navigation app.
The CarPlay Framework
What Apple cares about in UX is consistency between apps. That is why, for the CarPlay Framework, only the most fundamental interactions are exposed to developers. This is a restriction that is welcoming for our designers, as they have clear boundaries to work with. It also helps developers make safe apps that don’t distract the user too much from looking at the road behind the wheel.
Therefore, the CarPlay Framework is divided by a Template overlay and a CarPlay window separate from your iPhone’s window that you can set a rootViewController property for your ViewController.
CPMapContentWindow:
This window is the place for you to implement your custom views and navigation tiles. You do not seem to be restricted in what you can draw here, however, I assume Apple will be strict in the review process in what they will allow. This is mainly meant to be flexible to allow developers to implement their existing maps, not to go wild with complex User Interactions, as content in the CPMapContentWindow doesn’t accept user interactions. So how would you allow a user to interact with your CarPlay app? That is where Templates come in.
Templates:
A Template overlay is what you give to your CPInterfaceController that is responsible for your user interaction. You can switch between templates, via replacing an interfaceController’s rootTemplate, or by transitioning to another template via an equivalent pushing/popping like the UINavigationController. There are a couple of different Templates to choose from in the current iOS 12 beta build, but the most important one for CarPlay navigation apps is the CPMapTemplate one, as this both displays navigation interface elements to your user and lets the user interact with the map controls, like panning/pinching the map or important alerts with actions.
HelloWorld XCode project
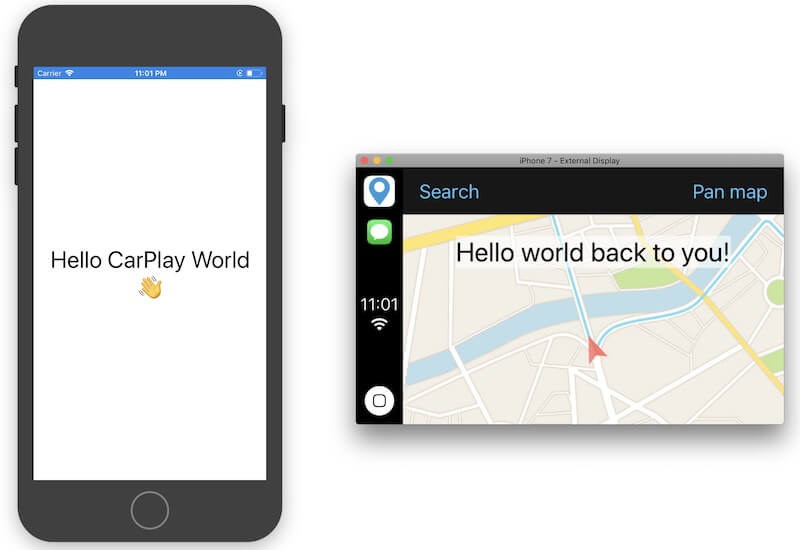
Here you can find my HelloWorld project (see screenshot of it at the beginning of this post) here. All the magic happens in the AppDelegate.swift, though I do not recommend following that lead when developing your own custom CarPlay app. Note: XCode 10 Beta 4 or later is needed to run this project.
Useful links
Some links that could help you get started:
- Documentation for CarPlay navigation apps: https://developer.apple.com/documentation/carplay
- WWDC 2018 video explaining the basis concepts and some common programming examples: https://developer.apple.com/videos/play/wwdc2018/213/
- To apply for your app to be allowed as a CarPlay navigation app: https://developer.apple.com/contact/carplay/
[ref] https://blog.flitsmeister.nl/start-developing-your-navigation-app-for-carplay-6e4c6c2b4e47
| 번호 | 분류 | 제목 | 글쓴이 | 날짜 | 조회 수 |
|---|---|---|---|---|---|
| 37 | Develop |
[php] 3 Ways to Detect Mobile or Desktop in PHP
|
hooni | 2020.01.28 | 5647 |
| 36 | System/OS |
RPA란? 어디에 어떻게 쓰이고 누가 만드나?
|
hooni | 2020.01.28 | 2345 |
| 35 | System/OS |
Configure Postfix to Use Gmail SMTP on Ubuntu 18.04
|
hooni | 2020.02.07 | 5561 |
| » | Develop |
[ios] Start developing your navigation app for CarPlay without enrollment
|
hooni | 2020.02.22 | 129892 |
| 33 | Develop |
[sh] html 안에 있는 img 다운 받는 쉘 스크립트
|
hooni | 2020.05.26 | 1597 |
| 32 | Develop | [sh] 쉘스크립트 if 비교 연산 | hooni | 2020.05.26 | 63167 |
| 31 | System/OS | [linux] The Ultimate Wget Download Guide With 15 Awesome Examples | hooni | 2020.05.26 | 2487 |
| 30 | System/OS | [linux] wget 명령 사용 예제 | hooni | 2020.05.26 | 2660 |
| 29 | System/OS |
[mac] VirtualBox 실행 스크립트와 bash_profile 설정
|
hooni | 2020.07.08 | 2206 |
| 28 | System/OS |
How to Install and Use wget on Mac
|
hooni | 2020.09.03 | 3405 |
| 27 | System/OS | Apache CORS 설정 1 | hooni | 2020.09.04 | 4377 |
| 26 | Develop | [js] Text 값을 클립보드에 복사하기 | hooni | 2020.10.10 | 1658 |
 Configure Postfix to Use Gmail SMTP on Ubuntu 18.04