Ray가 알림: 본 튜토리얼은 iOS 6 진수성찬의 세 번째 튜토리얼입니다. 우리는 iOS 6에 대한 이전 튜토리얼들을 업데이트하고 있습니다. 따라서 본 튜토리얼은 ARC, 스토리보드 그리고 iOS 6의 새로운 API등과 같은 최종 기능으로 업데이트 되었습니다.
본 튜토리얼은 독립 소프트웨어 개발자이자 게이머이면서 사이트 관리자인 Ray Wenderlich에 의해 작성되었습니다.
iOS 개발자에게 좋은 것 중 하나는 유료, 광고를 포함한 무료, 인앱구매등, 앱으로 수익을 내기 위한 다양한 모델이 있다는 것이다.
특히, 인앱구매는 여러가지 이유로 외면할 수 없는 선택이다.
- 단지 앱에 책정된 가격보다 더욱 많은 수익을 올릴 수 있다. 어떤 사용자들은 추가 컨첸츠에 많은 지불을 한다.
- 앱을 대부분의 사람들이 망설임 없이 다운로드 받도록 무료로 올릴 수 있다. 그리고 그 앱에 만족하면 그들은 추가 컨테츠를 구매할 수 있다.
- 앱을 처음 등록한 이후, 추후 추가 수익을 더 내기 위해 새로운 앱을 만들기 보다 그 앱에 추가 컨텐츠를 계속 등록할 수 있다.
인앱구매는 다양한 비지니스모델에 이용될 수 있다. 예컨데, Wild Fables의 경우 나는 3개의 스토리를 가진 무료앱을 만들었고 추가 컨텐츠는 인앱구매를 적용하였다. 그리고, 현재 업그레이드가 진행 중인 Battle Map의 경우 유료앱이지만 추가 컨텐츠 선택을 인앱구매로 적용하였다.
본 튜토리얼에서 우리는 앱에 포함된 로컬 컨텐츠를 인앱구매를 이용해 사용가능하도록(unlock) 하는 방법을 배우게 될 것이며 여러분은 인앱구매의 복잡한 비동기방식을 다룰 수 있게 될 것이다.
여러분이 iOS 프로그래밍 기본 개념에 친숙하다는 가정하에 진행하겠다. 만일 여러분이 iOS 개발 입문자라면 이 사이트에서 다른 튜토리얼들을 확인하기 바란다.
In App Rage
어떤 앱을 만들어 볼까? 음, 우선 약간의 배경 설명을 하겠다.
최근 나는 rage comics로 불리는 온라인 유머게시판과 때때로 즐기는 ”F7U12″에 빠지게 되었다. 이러한 것들을 들어본 적이 있는가? 요컨대 누군가 일반적인 실망스러운 상황에 처했을 때 거친 분노나 다른 유머 표현으로 마무리하는 재미있고 간단한 코믹이다.
그래서 본 튜토리얼에서는 사람들이 이들 코믹을 살 수 있도록 하는 ”In App Rage”라는 간단한 앱을 만들게 될 것이다. 그러나 그 전에, 여러분들은 iOS Developer Center와 iTunes Connect를 이용하여 App ID 생성과 앱 엔트리 등록을 먼저 해야 한다.
먼저 앱을 위한 App ID를 생성하자. 그러기 위해서 iOS Developer Center로 접속한 다음 ”App IDs”탭을 선택하고, “New App ID”를 클릭하자.

아래의 스크린샷 처럼 설명과 번들 식별자(bundle identifier)를 입력하자.
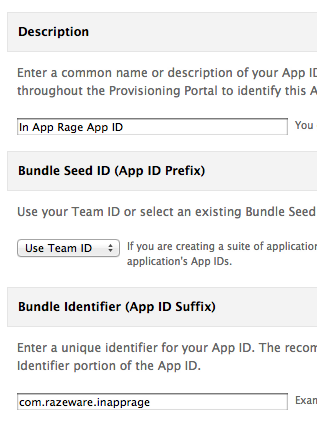
여러분 자신의 도메인 이름을 사용하여 bundle identifier를 입력해야 한다. 여러분의 이름이나 다른 어떤 것을 이용한 날조된 것은 사용할 수 없으며 정확히 유일한 ID여야 한다.
다 되었으면 Submit 버튼을 클릭하자. 이제 새로운 App ID를 가지게 되었다! 우리는 이것을 iTunes Connect에서 새로운 앱을 등록할 때 이용할 것이다 .
iTunes Connect로 접속한 후, “Manage Your Applications”을 클릭한 다음, “Add New App” 버튼을 클릭하자. iOS App과 Mac OSX App 선택화면이 나오면, 당연히 iOS App을 선택하자. 그리고 앱 이름, SKU number를 입력하고 위에서 생성해 두었던 Bundle ID를 선택하자.
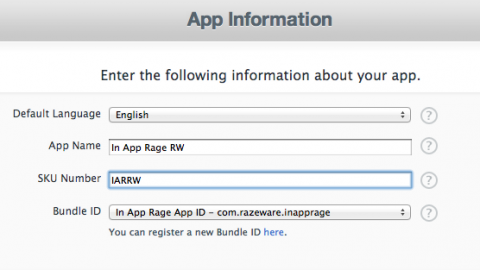
앱 이름은 유일해야 하기 때문에 여러분은 아마도 앱 이름을 위의 그림에서 제시된 것이 아닌 다른 것으로 변경해야 할 것이다. 나는 이를 위해 내 이름의 이니셜 ”RW”를 붙혔는데 여러분의 이름 이니셜로 변경하기 바란다.
다음 페이지에서 앱 정보들을 물어 올 것이다. 지금은 그냥 임시적인 간단한 정보만 입력하자. 나중에 변경할 수 있다. 그러나 불행히도 모든 항목을 채워넣어야 한다. 지금은 존재하지 않는 앱의 스크린샷 까지도…
여러분들이 아는 것 처럼, 나 또한 이런 상황이 맨붕이다.
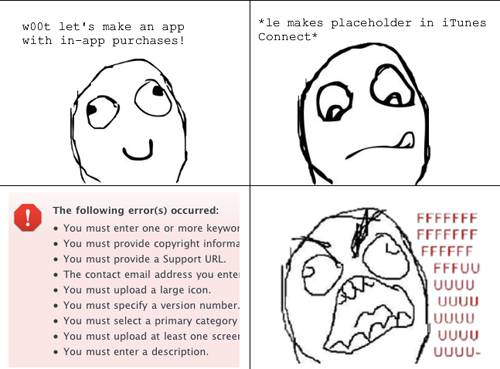
위와 같은 에러가 발생하면 그냥 아무거나 입력하자. 그리고 여기 아이콘과 거짓 스크린샷으로 에러를 내뿜는 iTunes Connect를 달래 주자.
에러가 모두 해결되면 앱 등록이 완료된다. 오예!~
인앱구매 관리
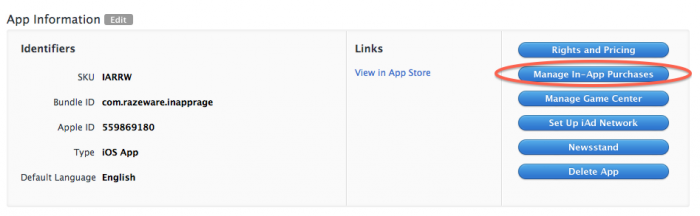
인앱구매를 코드로 구현하기 전에 앱을 등록하였기 때문에 iTunes Connect에서 인앱구매 항목을 생성할 수 있다. 지금 막 등록한 앱에서 아래와 같이 “Manage In App Purchases”을 클릭하자.
그런 다음 좌측 상단의 “Create New”버튼을 클릭하자.
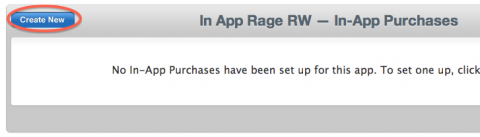
The Create New button for In-App Purchases
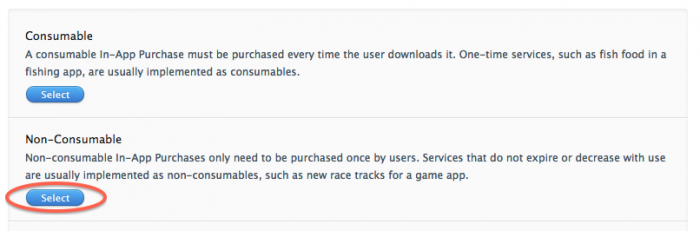
생성할 인앱구매의 형식을 선택하는 화면이 나타날 것이다. 대부분 자주 이용되는 형식은 두 가지이다.
- Consumables(소비형). 게임에서 흔히 볼 수 있는 생명력 보충, 게임머니, 임시강화제등과 같은 하나 이상을 구매하여 사용할 수 있는 것들이다.
- Non-Consumables(비소비형). 한 번의 구매로 계속적으로 이용할 수 있다. 추가 레벨이나 컨텐츠등이 이에 속한다.
우리가 만들고자 하는 In App Rage는 코믹이야기를 판매하는 것이므로 사용자는 한 번의 구매로 계속 이용할 수 있어야 한다. 따라서 Non-Consumable을 선택하겠다.
주의:모든 비소비형 구매는 사용자의 모든 기기에서 이용이 가능해야 한다. 예컨데 두 대의 기기를 가진 사용자가 있다면 동일한 인앱구매에 대해 두 번의 비용 결재가 되면 안된다는 것이다. 우리는 나중에 트랜잭션 복원에 대해 논의할 때 다른 디바이스에서 구매한 비소비형 컨텐츠를 사용자에게 제공하는 방법에 대해 다루게 될 것이다. 소비형의 경우에는 다르다. 소비형은 사용자가 구매한 기기에서만 사용될 수 있도록 하는 것이다. 디바이스들간의 소비형 구매 아이템 공유를 원한다면, 아이클라우드나 다른 기술을 이용해 직접 구현해야 한다.
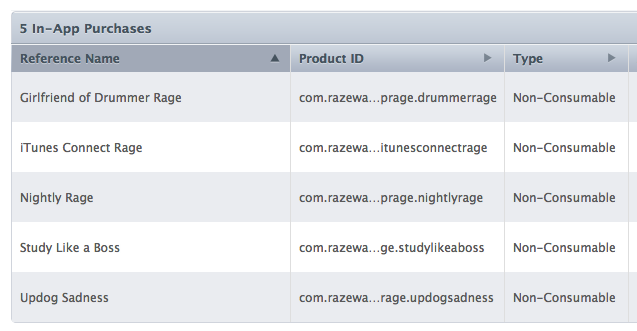
다음으로, 인앱구매 항목에 대한 정보를 입력해야 한다. 아래의 그림을 참고하여 각 필드를 채워 보자.
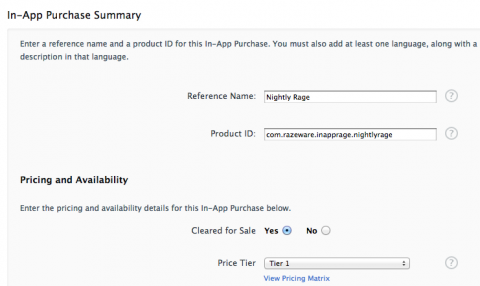
각 필드에 대해 살펴보자.
- Reference Name: iTunes Connect에서 보여질 인앱구매 항목의 이름이다. 이것은 앱에서는 노출되지 않기 때문에 자유롭게 입력하면 된다.
- Product ID: 애플 문서에서는 “product identifier”로 표현되고 있는데, 인앱구매 항목을 식별할 수 있는 유일한 고유 문자열이다. 일반적으로 이 항목을 사용할 앱의 번들아이디로 시작하는 것이 가장 좋으며, 항목의 고유이름을 끝에 추가한다.
- Cleared for Sale: 앱이 앱스토어에 활성화 되자마자 구매가 가능한지 여부를 지정한다.
- Price Tier: 인앱구매 항목의 가격이다.
설정을 마친 후 언어(Language)섹션으로 스크롤 이동하여 Add Language 버튼을 클릭하고 아래 그림과 같이 입력하자.
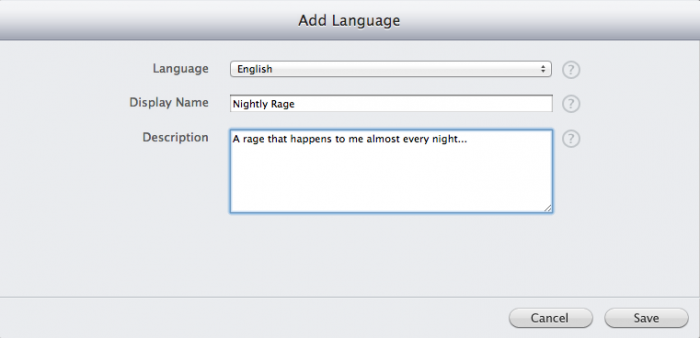
이 정보들은 나중에 앱스토어에 인앱구매항목을 조회했을 때 받을 수 있는 정보들이다.
이 과정이 왜 필요한지 의아해 할지 모르겠다. 어쨌든 앱에 이 정보들을 포함할 수 있는데 말이다. 분명히 애플은 가격을 알 필요가 있다. 또한 앱스토어에서 이 정보의 일부가 표시된다. (최고 인앱구매항목을 표시하는것 처럼). 결국, 이러한 것들이 앱에 하드 코딩된 정보를 피하고, 구매를 활성화거나 비활성화하기 위한 목적으로 쉽게 적용될 수 있다.
모든걸 마쳤다면 저장하고 아래의 그림처럼 나머지 항목들을 생성하자. 항목의 설명에 대해서는 신경쓰지 말자. 본 튜토리얼에서는 사용되지 않는다. 항목의 Display Name만 이용될 것이다.
이들 과정이 시간을 꽤나 잡아 먹는다는걸 눈치챘을 것이다. 만일 1톤의 인앱구매 항목을 가지고 있다면 얼마나 성가신 일인지 상상이 간다. 다행히도 그런상황은 아니지만 만일 그렇다면 rage comic으로 가서 나를 그려라. :]
인앱구매 프로덕트 목록 가져오기
앱에서 사용자가 프로덕트에 대해 구매가 가능하도록 하기 전에 서버로부터 구매가능한 프로덕트 목록을 가져오는 쿼리를 iTunes Connect에 발행해야 한다.
이를 위해 프로덕트를 사용하는 뷰 컨트롤러에서 코드로 구현할 수 있겠지만, 재사용이 쉽지 않기 때문에 적절치 않다. 대신 인앱구매의 모든 동작을 관리하는 헬퍼 클래스를 만들 것이며, 여러분의 프로젝트에서도 쉽게 재사용할 수 있을 것이다.
서버로 부터 프로덕트 목록을 받는 것과 함께, 이 헬퍼 클래스는 구매완료된 것과 구매되지 않은 프로덕트를 기억할 것이다. 구매완료된 각 프로덕트 구분자는 NSUserDefaults로 저장할 것이다.
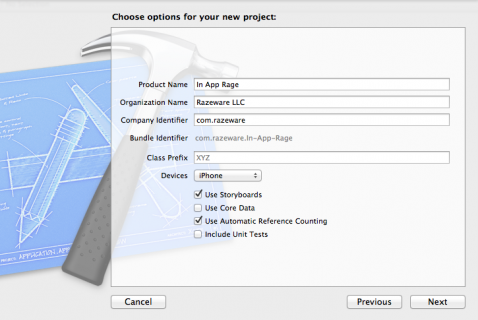
자, 시작하자. XCode에서 iOS Application의 Master-Detail Application 템플릿으로 프로젝트를 생성하자. 이름으로 InAppRage라고 입력하고, 디바이스는 iPhone으로 지정한 다음 Use Storyboards와 Use Automatic Reference Counting을 체크하자.
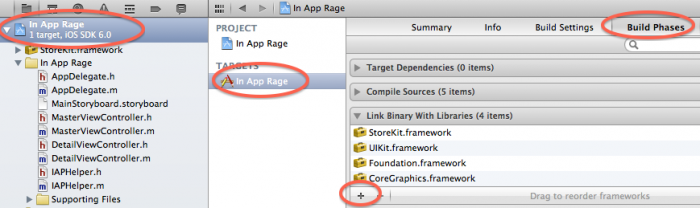
다음으로, 인앱구매에서 요구되는 StoreKit 라이브러리를 프로젝트에 추가하자. 이를 위해 프로젝트 네비게이터에서 프로젝트를 선택하고 In App Rage target을 선택하자. Build Phases 탭에서, Link Binary with Libraries 섹션을 확장하고, + 버튼을 클릭하자. 리스트에서 StoreKit.framework를 찾은 다음 Add 버튼을 클릭하자.
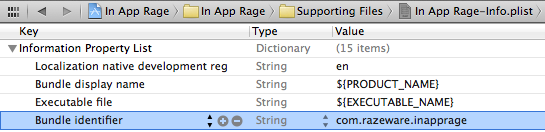
마지막 설정 단계로, Supporting Files의 In App Rage-Info.plist 파일을 열어서 Bundle identifier를 위에서 생성했던 App ID로 변경하자.
마침내 코딩을 할 시간이다. iOS Cocoa Touch의 Objective-C class 템플릿으로 파일을 생성하자. 클래스 이름은 IAPHelper로 하고 NSObject의 서브클래스가 되도록 하자.
IAPHelper.h 파일을 열어서 아래와 같이 변경하자.
typedef void (^RequestProductsCompletionHandler)
    (BOOL success, NSArray * products);

@interface IAPHelper : NSObject

- (id)initWithProductIdentifiers:(NSSet *)productIdentifiers;
- (void)requestProductsWithCompletionHandler:
    (RequestProductsCompletionHandler)completionHandler;

@end
이 클래스는 두 개의 메소드를 가지는데, 하나는 프로덕트 식별자(com.razeware.inapprage.nightlyrage와 같은) 목록을 넘겨서 초기화를 진행하고, 다른 하나는 iTunes Connect로 부터 프로덕트 정보를 가져오는 메소드이다. 두 번째 메소드는 비동기 방식으로 작동되며 정보 수신 완료시 호출자에게 통보할 수 있도록 블럭 파라미터를 넘긴다.
참고: 아직 블럭을 잘 모르겠는가? iOS 5 튜토리얼 시리즈에서 블럭을 사용하는 방법을 참고하자.
다음으로 IAPHelper.m 파일에 아래의 코드를 구현하자.
// 1
#import "IAPHelper.h"
#import <StoreKit/StoreKit.h>

// 2
@interface IAPHelper ()
@end

@implementation IAPHelper {
    // 3
    SKProductsRequest * _productsRequest;
    // 4
    RequestProductsCompletionHandler _completionHandler;
    NSSet * _productIdentifiers;
    NSMutableSet * _purchasedProductIdentifiers;
}

@end
각 섹션별로 무엇을 했는지 살펴보자.
- In-App Purchase API를 사용하기 위해서는 StoreKit을 이용해야 하기 때문에 StoreKit 헤더를 포함한다.
- StoreKit으로부터 프로덕트 목록을 가져오려면 SKProductsRequestDelegate protocol을 구현해야 한다. 여기서 클래스 확장으로 이 프로토콜을 명시한다.
- 클래스가 유지되는 동안 프로덕트 목록을 가져오기 위해 발행하는 SKProductsRequest를 저장하는 인스턴스 변수를 선언한다. 클래스가 이미 활성화되었는지 판단하거나 클래스가 유지되는 동안 메모리에서의 보증을 요구하는 참조로 유지된다.
- 미해걸된 프로덕트 요청을 위한 completion handler, 전달 받은 프로덕트 식별자 목록 그리고 이전에 구매된 프로덕트 식별자 목록도 기억해야 한다.
다음으로 초기화 메소드를 추가하자.
- (id)initWithProductIdentifiers:(NSSet *)productIdentifiers {

    if ((self = [super init])) {

        // 프로덕트 식별자 목록 저장
        _productIdentifiers = productIdentifiers;

        // 이전에 구매하였는지 확인
        _purchasedProductIdentifiers = [NSMutableSet set];
        for (NSString * productIdentifier in _productIdentifiers) {
            BOOL productPurchased =
                [[NSUserDefaults standardUserDefaults]
                    boolForKey:productIdentifier];

            if (productPurchased) {
                [_purchasedProductIdentifiers addObject:productIdentifier];
                NSLog(@"Previously purchased: %@", productIdentifier);
            } else {
                NSLog(@"Not purchased: %@", productIdentifier);
            }
        }

    }
    return self;
}
여기서 NSUserDefaults에 저장된 값을 기초로 각 프로덕트들이 구매되었는지 여부를 판단하고 구매된 프로덕트 식별자를 리스트에 기억시킨다.
다음으로, iTunes Connect로 부터 프로덕트 정보를 가져오는 메소드를 구현하자.
- (void)requestProductsWithCompletionHandler:
    (RequestProductsCompletionHandler)completionHandler {

    // 1
    _completionHandler = [completionHandler copy];

    // 2
    _productsRequest =
        [[SKProductsRequest alloc]
            initWithProductIdentifiers:_productIdentifiers];

    _productsRequest.delegate = self;
    [_productsRequest start];
}
먼저 프로덕트 비동기 요청이 완료되었을 때 호출자에게 통보할 수 있도록 completion handler의 copy를 인스턴스 변수에 저장한다.
그런 다음 iTunes Connect로 부터 정보를 가져오는 코드가 포함된, 애플이 작성한 클래스 SKProductsRequest 인스턴스를 생성하자. 사용은 아주 쉽다. SKProductsRequestDelegate 프로토콜을 따르는 델리게이트를 지정하고 실행을 위해 start 메소드를 호출하면 된다.
프로덕트 목록이 완료되거나 실패했을 때 productsRequest:didReceiveResponse 또는 request:didFailWithErorr 콜백을 받을 수 있도록 IAPHelper 클래스 자체를 델리게이트로 지정한다.
이제 델리게이트 콜백을 추가하자. 아래의 코드를 @end 이전에 추가하자.
#pragma mark - SKProductsRequestDelegate

- (void)productsRequest:(SKProductsRequest *)request
        didReceiveResponse:(SKProductsResponse *)response {

    NSLog(@"Loaded list of products...");
    _productsRequest = nil;

    NSArray * skProducts = response.products;
    for (SKProduct * skProduct in skProducts) {
        NSLog(@"Found product: %@ %@ %0.2f",
              skProduct.productIdentifier,
              skProduct.localizedTitle,
              skProduct.price.floatValue);
    }

    _completionHandler(YES, skProducts);
    _completionHandler = nil;

}

- (void)request:(SKRequest *)request didFailWithError:(NSError *)error {

    NSLog(@"Failed to load list of products.");
    _productsRequest = nil;

    _completionHandler(NO, nil);
    _completionHandler = nil;

}
성공과 실패를 위한 두 개의 델리게이트 콜백을 구현하였다. 성공일 때는 프로덕트 식별자, 지역화된 제목, 가격등과 같은 전송받은 프로덕트의 정보를 기록하고, 실패일 때는 _productsRequest 인스턴스 변수를 nil로 되돌리고 completion handler를 호출한다.
프로젝트를 빌드하여 컴파일에 오류가 없는지 확인하자.
앱을 위한 서브클래싱
IAPHelper 클래스는 프로덕트 식별자를 지정함으로써 여러분 자신의 앱을 위해 쉽게 서브클래싱할 수 있도록 작성되었다. 많은 사람들이 앱 업데이트보다 인앱구매 항목을 동적으로 추가할 수 있도록 프로덕트 식별자를 다른 정보와 함께 웹 서버로 부터 가져올 것을 추천한다.
당연하다. 하지만 본 튜토리얼에서는 여러분이 간단하게 진행하도록 하기 위해 프로덕트 식별자를 하드코딩하도록 하겠다.
iOS Cocoa Touch의 Objective-C class 템플릿으로 파일을 생성하고 클래스 이름은 RageIAPHelper로 하고 IAPHelper의 서브클래스로 지정하자.
RageIAPHelper.h를 열어 아래와 같이 수정하자.
#import "IAPHelper.h"

@interface RageIAPHelper : IAPHelper

+ (RageIAPHelper *)sharedInstance;

@end
클래스의 싱글 글로벌 인스턴스를 리턴하는 static 메소드를 선언하였다.
다음으로 RageIAPHelper.m 을 열어 아래와 같이 수정하자.
#import "RageIAPHelper.h"

@implementation RageIAPHelper

+ (RageIAPHelper *)sharedInstance {
    static dispatch_once_t once;
    static RageIAPHelper * sharedInstance;

    dispatch_once(&once, ^{
        NSSet * productIdentifiers = [NSSet setWithObjects:
            @"com.razeware.inapprage.drummerrage",
            @"com.razeware.inapprage.itunesconnectrage",
            @"com.razeware.inapprage.nightlyrage",
            @"com.razeware.inapprage.studylikeaboss",
            @"com.razeware.inapprage.updogsadness",
            nil];

        sharedInstance =
            [[self alloc] initWithProductIdentifiers:productIdentifiers];
    });
    return sharedInstance;
}

@end
sharedInstance 메소드는 RageIAPHelper 클래스의 싱글 글로벌 인스턴스를 리턴하는, Objective-C의 싱글톤 패턴으로 구현되었다. iTunes Connect에서 생성한 프로덕트 식별자들을 넘기는 것으로 슈퍼클래스의 초기화 메소드를 호출하였다.
이 프로덕트 식별자들은 iTunes Connect에서 생성한 실제 값이어야 한다는 것을 잊지 말자.
한 번 더 빌드해 보자. 컴파일에 에러가 없는지 다시 확인하자.
프로덕트 표시하기
프로덕트 정보들을 받았다. 이제 그것들을 스크린에 표시해 볼 시간이다.
MasterViewController.m 파일을 열어 아래의 코드로 모두 대치하자.
#import "MasterViewController.h"
#import "DetailViewController.h"

// 1
#import "RageIAPHelper.h"
#import <StoreKit/StoreKit.h>

// 2
@interface MasterViewController () {
    NSArray *_products;
}
@end

@implementation MasterViewController

// 3
- (void)viewDidLoad
{
    [super viewDidLoad];

    self.title = @"In App Rage";

    self.refreshControl = [[UIRefreshControl alloc] init];
    [self.refreshControl addTarget:self action:@selector(reload)
        forControlEvents:UIControlEventValueChanged];

    [self reload];
    [self.refreshControl beginRefreshing];

}

// 4
- (void)reload {
    _products = nil;
    [self.tableView reloadData];
    [[RageIAPHelper sharedInstance]
    requestProductsWithCompletionHandler:^(BOOL success, NSArray *products)
    {
        if (success) {
            _products = products;
            [self.tableView reloadData];
        }
        [self.refreshControl endRefreshing];
    }];
}

#pragma mark - Table View

- (NSInteger)numberOfSectionsInTableView:(UITableView *)tableView
{
    return 1;
}

// 5
- (NSInteger)tableView:(UITableView *)tableView
    numberOfRowsInSection:(NSInteger)section
{
    return _products.count;
}

- (UITableViewCell *)tableView:(UITableView *)tableView
    cellForRowAtIndexPath:(NSIndexPath *)indexPath
{
    UITableViewCell *cell = [tableView
        dequeueReusableCellWithIdentifier:@"Cell" forIndexPath:indexPath];

    SKProduct * product = (SKProduct *) _products[indexPath.row];
    cell.textLabel.text = product.localizedTitle;

    return cell;
}

@end
여기 훌륭한 약간의 코드가 있다. 하나씩 살펴 보자.
- iTunes Connect에서 받은 SKProduct 정보를 사용하기 위해 StoreKit 헤더와 함께 앞서 작성한 RageIAPHelper 클래스를 임포트하였다.
- iTunes Connect에서 받은 SKProduct를 저장하기 위한 인스턴스 변수를 추가하였다. 테이블뷰의 각 행에는 프로덕트 제목이 보여질 것이다.
- 이것은 굉장히 편리한 iOS 6의 새로운 잡아당겨 새로고침 테이블뷰 컨트롤의 예제이다. 위에서 보듯 굉장히 사용하기 쉽다. UIRefreshControl 인스턴스를 생성하고 UITableViewController의 멤버변수 refreshControl에 대입만 해주면 된다. 그런 다음 사용자가 새로고침을 위해 테이블을 잡아 당겼을 때 호출될 타겟을 등록해주면 된다. 여기서는 reload 메소드가 호출되도록 하였다. 기본적으로 이것은 테이블뷰가 처음으로 보여질 때 발생하지 않는다. 따라서 여기서는 처음으로 보여질 때 reload 메소드를 호출하고 리프레쉬 컨트롤에 첫 시작임을 코드로 직접 알리도록 하였다.
- 첫 시작, 또는 사용자가 새로고침을 위해 화면을 밑으로 당겨서 reload 메소드가 호출되었을 때, iTunes Connect로 부터 인앱구매 프로덕트 정보를 받기 위해 앞서 구현하였던 RageIAPHelper의 requestProductsWithCompletionHandler 메소드가 호출되도록 하였다. 이 요청이 완료되면 블럭이 호출될 것이다. 블럭안에서는 프로덕트 목록을 인스턴스 변수에 대입하고, 테이블뷰를 갱신하고, 리프레쉬 컨트롤의 애니메이션을 중지시키도록 하였다.
- SKProduct의 지역화된 제목을 각 행에 표시하기 위한 테이블뷰의 일반적인 구현이다.
빌드와 실행을 해 보자. 테이블뷰에 프로덕트 목록이 보여질 것이다.
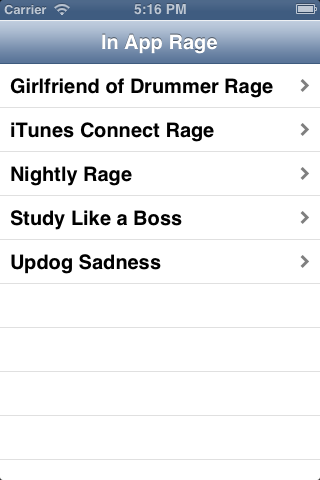
In-App Rage products
잘 동작되지 않는가? 그렇다면 아래의 사항들을 확인해 보자. 다음의 내용은 포럼의 itsme.manish와 abgtan이 제공하였다.
- 기기의 “설정” -> “iTunes & App Stores”로 가서 모든 계정을 로그아웃하고 샌드박스 계정을 이용해 다시 시도해 보자.
- 여기를 확인해 보자. 응답이 없으면 iTunes sandbox가 다운되었을 수 있다.
- 해당 App ID의 인앱구매가 활성화되었는가?
- 해당 프로젝트 .plist의 Bundle ID가 App ID와 동일한가?
- SKProductRequest을 생성할 때 올바른 Product ID를 넘겼는가?
- iTunes Connect에 프로덕트를 추가한 이후 몇 시간정도 기다려 보고 다시 시도해 보자.
- iTunes Connect에 은행 계좌관련 정보를 정확히 입력하고 활성화 되었는가?
- 기기에서 앱을 삭제하고 재설치 해보자.
여전히 안되는가? 그러면 포럼 게시글이나 관련 코멘트를 살펴보자.
쇼미더머니
내용이 많이 길어졌지만 가장 중요한 부분이 아직 남아 있다. 구매를 구현하고 돈을 모으는 것!
구매 구현의 기본 요지는 아래와 같다.
- SKPayment 오브젝트를 만들고 사용자가 구매를 원하는 프로덕트 식별자를 전달해야 한다. 그리고 그것을 지불 큐에 추가해야 한다.
- StoreKit은 “정말로 구매하겠습니까?”라고 사용자에게 물어볼 것이고, 계정과 비밀번호 입력을 요구할 것이며, 요금청구를 생성하고, 성공 혹은 실패를 보낼 것이다. 또한 재다운로드를 위한 이미 구매된 것인 경우를 파악하여 그에 대한 메시지를 보낼 것이다.
- 여러분은 구매통보를 받기 위한 특별한 오브젝트를 지정해야 한다. 이 오브젝트는 컨텐츠 다운로드를 시작하고(여기서는 하드코딩되어 있기 때문에 필요가 없다.), 컨텐츠를 사용가능하도록 unlock할 것이다. (여기서는 NSUserDefaults와 purchasedProducts 배열에 구매정보를 저장할 것이다.)
걱정하지 말자. 코드를 보면 꽤 쉽다. 다시 한 번, 재사용을 쉽게 하기 위해 IAPHelper 클래스에서 대부분을 구현할 것이다. 아래의 코드를 IAPHelper.h 파일에 추가하자.
// 파일의 첫 부분에 추가하자
#import <StoreKit/StoreKit.h>
UIKIT_EXTERN NSString *const IAPHelperProductPurchasedNotification;

// 2개의 새로운 메소드 선언
- (void)buyProduct:(SKProduct *)product;
- (BOOL)productPurchased:(NSString *)productIdentifier;
프로덕트가 구매되었을 때 통보를 받기 위한 통보식별자를 선언하였고, 프로덕트 구매를 시작하는 메소드와 구매가 완료되었는지를 판단하는 메소드를 선언하였다.
다음으로, IAPHelper.m 파일에 아래의 코드를 추가하자.
- (BOOL)productPurchased:(NSString *)productIdentifier {
    return [_purchasedProductIdentifiers containsObject:productIdentifier];
}

- (void)buyProduct:(SKProduct *)product {

    NSLog(@"Buying %@...", product.productIdentifier);

    SKPayment * payment = [SKPayment paymentWithProduct:product];
    [[SKPaymentQueue defaultQueue] addPayment:payment];

}
이 과정은 해당 프로덕트가 구매가능한 상태인지를 먼저 확인하고, 그렇다면 구배 진행중으로 표시한 다음 SKPaymentQueue에 SKPayment를 추가한다.
이것은 실제로 사용자에게 확실한 현금을 지불하도록 하는 것이다. 사용자들에게 거의 “닥치고 돈내놔!” 라고 말하는 것이나 다름 없다.
그러나, 사용자로 하여금 돈을 지불하도록 하려면 사용자에게 뭔가 좋은 것을 제공하여야 한다. 여러분들이 그리스 정부가 아닌 이상…
따라서, 여러분들은 지불 트랜잭션이 완료되었는지 판별하고 그것을 적절히 처리하는 코드를 추가해야 한다.
아주 쉽게 하도록 하자. 먼저 SKPaymentTransactionObserver를 구현하기 위해 IAPHelper 클래스의 확장을 아래와 같이 수정하자.
@interface IAPHelper ()
그런 다음 아래의 코드를 initWithProductIdentifiers 메소드에서 if 블럭 안에 추가하자.
[[SKPaymentQueue defaultQueue] addTransactionObserver:self];
이제, IAPHelper가 초기화 되었을 때, 자기 자신을 SKPaymentQueue의 transaction observer로 만들 것이다. 즉, 애플은 누군가 어떤 것을 구매했을 때 여러분에게 그것을 알리게 될 것이다.
여기서 정말로 중요한 것이 하나 있다. 사용자가 구매를 시작하고 (그리고 대금청구를 받고) 애플이 성공이나 실패 응답을 주기 전에 사용자가 앱을 종료하거나 네트워크 연결이 갑자기 끊어지는 경우가 종종 발생할 수 있다. 이때 사용자는 여전히 구매에 대한 기대감을 가지고 있겠으나 곧 엄청난 분노의 얼굴로 변할 것이다.
다행히도, 애플은 이에 대한 해결책을 가지고 있다. 그것은 앱에서 아직 완전히 처리되지 않은 모든 구매 트랜잭션을 애플이 기억하도록 하고 그것들을 transaction observer에 통보하는 것이다. 그러나 이것이 잘 동작되기 위해서는 앱이 초기화될 때 가능한 빨리 여러분의 클래스를 transaction observer로 등록하여야 한다.
이를 위해 AppDelegate.m 아래처럼 임포트하자.
#import "RageIAPHelper.h"
그런 다음, 아래의 코드를 application:didFinishLaunchingWithOptions 메소드 시작 부분에 추가하자.
[RageIAPHelper sharedInstance];
이제 앱이 실행되자마자 RageIAPHelper 싱글톤이 생성될 것이다. 이것은 앞서 수정한 initWithProducts메소드를 호출하도록 하여 그 자신을 transaction observer로 등록할 것이다. 그리하여 여러분은 완료되지 않은 모든 트랜잭션을 통보받을 수 있을 것이다.
여러분은 SKPaymentTransactionObserver 프로토콜을 구현해야 한다. IAPHelper.m에 아래의 메소드를 추가하자.
- (void)paymentQueue:(SKPaymentQueue *)queue
    updatedTransactions:(NSArray *)transactions
{
    for (SKPaymentTransaction * transaction in transactions) {
        switch (transaction.transactionState)
        {
            case SKPaymentTransactionStatePurchased:
                [self completeTransaction:transaction];
                break;
            case SKPaymentTransactionStateFailed:
                [self failedTransaction:transaction];
                break;
            case SKPaymentTransactionStateRestored:
                [self restoreTransaction:transaction];
            default:
                break;
        }
    };
}
실제로 이것은 프로토콜에서 요구되는 메소드이다. 업데이트된 트랜잭션 목록을 여러분에게 제공하는데 여러분은 그 목록의 각 항목의 상태에 따라 달라진 부분을 처리해야 한다. 깔끔한 코드를 유지하기 위해 트랜잭션의 완료, 실패, 복원에 따라 각기 다른 메소드를 호출하도록 하였다.
완료와 실패는 알겠는데 복원은 무엇일까? 인앱구매 형식을 기억해 보자. 사용자가 비소비형 구매를 복원하는 방법이 있어야 한다고 앞서 설명했었다. 이것은 사용자가 같은 앱을 다른기기들에서 사용하거나 앱을 지웠다가 재설치하여 이전에 구매한 프로덕트를 사용하고자 할 경우 중요한 사안이 된다. 나중에 앱에 이 방법을 구현할 것이다. 지금은 사용자가 그들의 구매가 복원되기를 원할 때 해당 트랜잭션이 온다는 사실만 알도록 하자.
다음으로 중요한 completeTransaction, restoreTransaction, 그리고 failedTransaction 메소드를 구현하자. 아래의 코드를 추가하자.
- (void)completeTransaction:(SKPaymentTransaction *)transaction {
    NSLog(@"completeTransaction...");

    [self provideContentForProductIdentifier:
        transaction.payment.productIdentifier];

    [[SKPaymentQueue defaultQueue] finishTransaction:transaction];
}

- (void)restoreTransaction:(SKPaymentTransaction *)transaction {
    NSLog(@"restoreTransaction...");

    [self provideContentForProductIdentifier:
        transaction.originalTransaction.payment.productIdentifier];

    [[SKPaymentQueue defaultQueue] finishTransaction:transaction];
}

- (void)failedTransaction:(SKPaymentTransaction *)transaction {

    NSLog(@"failedTransaction...");
    if (transaction.error.code != SKErrorPaymentCancelled)
    {
        NSLog(@"Transaction error: %@",
            transaction.error.localizedDescription);
    }

    [[SKPaymentQueue defaultQueue] finishTransaction: transaction];
}
completeTransaction과 restoreTransaction은 같은 작업을 수행한다. 주어진 컨텐츠를 제공하는 함수를 호출하는데 나중에 곧 구현할 것이다.
failedTransaction은 약간 다르다. 구매가 실패했음을 사용자에게 알리는 메소드를 호출하고(이것 역시 나중에 구현할 것이다) 더 이상 구매가 진행되지 않도록 하며 트랜잭션을 완료한다.
주의: finishTransaction 호출은 아주 중요하다. StoreKit이 처리가 완료되었읍을 알게 하는 것인데, 이를 호출하지 않으면 앱이 실행될 때마다 트랜잭션 전달이 계속될 것이다.
마침내, 아래의 마지막 코드를 추가하자.
// 파일의 윗 부분에 추가하자.
NSString *const IAPHelperProductPurchasedNotification =
    @"IAPHelperProductPurchasedNotification";

// 새로운 메소드 구현을 추가하자.
- (void)provideContentForProductIdentifier:(NSString *)productIdentifier
{
     [_purchasedProductIdentifiers addObject:productIdentifier];
    [[NSUserDefaults standardUserDefaults]
        setBool:YES forKey:productIdentifier];
    [[NSUserDefaults standardUserDefaults] synchronize];

    [[NSNotificationCenter defaultCenter]
        postNotificationName:IAPHelperProductPurchasedNotification
        object:productIdentifier userInfo:nil];

}
프로덕트가 구매되었을 때, 이 메소드는 해당 프로덕트 식별자를 구매목록에 추가하고, NSUserDefaults에 이 정보를 저장한 다음 다른 곳에서 인식될 수 있도록 노티피케이션을 보낸다.
구매 코드는 끝났다. 이제 사용자 인터페이스에 적용하는 것만 남았다. 먼저 MainStoryboard.storyboard 열어서 table view cell의 스타일을 Subtitle로 변경하자.
그런 다음 MasterViewController.m 파일을 아래의 내용대로 수정하자.
// 클래스 익스텐션에 추가하자
NSNumberFormatter * _priceFormatter;
// viewDidLoad 하단에 추가하자
_priceFormatter = [[NSNumberFormatter alloc] init];
[_priceFormatter setFormatterBehavior:NSNumberFormatterBehavior10_4];
[_priceFormatter setNumberStyle:NSNumberFormatterCurrencyStyle];
// tableView:cellForRowAtIndexPath 하단에 추가하자 (return cell 위에)
[_priceFormatter setLocale:product.priceLocale];
cell.detailTextLabel.text =
[_priceFormatter stringFromNumber:product.price];
if ([[RageIAPHelper sharedInstance]
productPurchased:product.productIdentifier])
{
cell.accessoryType = UITableViewCellAccessoryCheckmark;
cell.accessoryView = nil;
} else {
UIButton *buyButton = [UIButton buttonWithType:UIButtonTypeRoundedRect];
buyButton.frame = CGRectMake(0, 0, 72, 37);
[buyButton setTitle:@"Buy" forState:UIControlStateNormal];
buyButton.tag = indexPath.row;
[buyButton addTarget:self action:@selector(buyButtonTapped:)
forControlEvents:UIControlEventTouchUpInside];
cell.accessoryType = UITableViewCellAccessoryNone;
cell.accessoryView = buyButton;
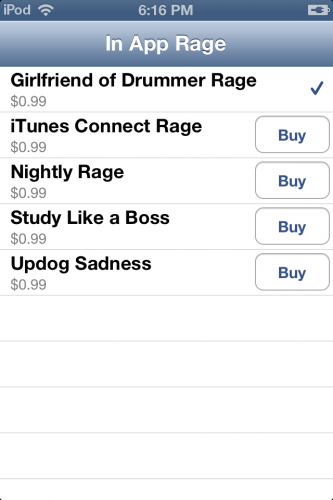
}여기서 통화형식으로 서브타이틀에 가격을 표시하였다. 그리고 구매되지 않은 프로덕트일 경우 액서서리뷰로 “buy” 버튼이 보이도록 하였고, 구매된 프로덕트일 경우 채크표시가 보이도록 하였다.
구매 버튼을 탭했을 때 호출될 메소드를 아래와 같이 구현하자.
- (void)buyButtonTapped:(id)sender {

    UIButton *buyButton = (UIButton *)sender;
    SKProduct *product = _products[buyButton.tag];

    NSLog(@"Buying %@...", product.productIdentifier);
    [[RageIAPHelper sharedInstance] buyProduct:product];
}
여기서 tag를 이용한 간단한 방법으로 선택한 프로덕트를 알아내고, 구매를 위해 앞서 작성한 메소드를 호출하였다.
구매가 완료 되었을 때 노티피케이션을 보낸다는 사실을 기억하자. 그래서 노티피케이션을 등록하고 그것이 발생했을 때 해당 셀에 채크표시가 나타나도록 갱신하자.
- (void)viewWillAppear:(BOOL)animated {
    [[NSNotificationCenter defaultCenter]
        addObserver:self selector:@selector(productPurchased:)
        name:IAPHelperProductPurchasedNotification object:nil];
}

- (void)viewWillDisappear:(BOOL)animated {
    [[NSNotificationCenter defaultCenter] removeObserver:self];
}

- (void)productPurchased:(NSNotification *)notification {

    NSString * productIdentifier = notification.object;
    [_products enumerateObjectsUsingBlock:
        ^(SKProduct * product, NSUInteger idx, BOOL *stop) {
        if ([product.productIdentifier isEqualToString:productIdentifier]) {
            [self.tableView reloadRowsAtIndexPaths:
                @[[NSIndexPath indexPathForRow:idx inSection:0]]
                withRowAnimation:UITableViewRowAnimationFade];
            *stop = YES;
        }
    }];
}
자 이제 맛볼 시간이 거의 다 되었다. 그러나 테스트 계정을 먼저 생성해야 한다.
인앱구매와 계정 그리고 샌드박스
Xcode에서 앱을 실행하면 인앱구서버를 향하여 실행되는 것이 아니고 샌드박스 서버를 향하여 실행되는 것이다.
이것은 대금청구등과 같은 우려없이 구매를 할 수 있다는 것이다. 그러나 테스트 계정을 만들어야 하고 기기에서 앱스토어 로그아웃을 해야 한다. 이에 대한 전체과정을 살펴보자.
계정을 만들기 위해 iTunes Connect에 로그인하여 “Manage Users” 클릭, “Test User”를 클릭하고 들어가 샌드박스서버에서 임시로 인앱구매가 가능하도록 테스트 유저 계정을 만들자.
그런 다음 여러분의 아이폰에서 현재의 계정을 로그아웃하자. “설정”에서 “iTunes 및 App Store”로 들어가 현재 연결된 계정을 로그아웃하면 된다
자, 드디어, 앱을 실행하여 rage comic을 구매해 보자. 테스트 계정정보를 입력하고, 모든 진행이 잘 된다면 반가운 체크표시로 구매가 이루어질 것이다.
그런데, 잠깐, 코믹은 어딨지? 체크표시를 구매한 것도 아니고…
어쨋든, 이 포스팅이 너무 길어졌다. 코믹을 표시하는 작업은 인앱구매와는 별 관련이 없다. 그래서 추가연습으로 남겨두겠다.
resources zip 파일에 본 튜토리얼에 필요한 이미지와 코믹들이 포함되어 있으니 마음이 내키면 구매된 항목을 탭했을 때 새로운 뷰컨트롤러에서 코믹을 보여주도록 하기 바란다. 코믹을 보여주기 전에 InAppRageIAPHelper의 purchasedProducts 배열에 해당 프로덕트 식별자가 있는지 먼저 확인해야 할 것이다.
트랜잭션 복원
원 모어 씽!~
최근 인앱구매로 구현된 모든 앱에서 구매 트랜잭션을 복원할 수 있도록 하는 버튼이 요구된다. 앞서도 말했듯이, 사용자가 다른 기기에서 구매한 컨텐츠를 이용하고자 할 경우 매우 유용하다.
우리는 이미 견고한 프레임웍을 마련해 놓았기 때문에 믿을 수 없을 정도로 쉽게 구현할 수 있다.
먼저 IAPHelper.h 파일에서 아래의 메소드를 선언하자.
- (void)restoreCompletedTransactions;
그리고 IAPHelper.m 파일에서 아래와 같이 구현하자.
- (void)restoreCompletedTransactions {
    [[SKPaymentQueue defaultQueue] restoreCompletedTransactions];
}
오예!~ 이보다 더 간단할 수 없다. iTunes Connect로 연결하여 이미 구매한 비소비형 프로덕트를 발견해 내도록 하는 것이다. 그런 다음 각각에 대해 SKPaymentTransactionStateRestored로 paymentQueue:updatedTransactions를 호출할 것이다. 여러분은 여기서 이미 컨텐츠를 제공(unlock)하도록 구현하였다.
이제 남은 것은 이 메소드를 호출하는 것 뿐이다. MasterViewController.m에 아래의 코드를 추가하자.
// viewDidLoad 하단에 추가
self.navigationItem.rightBarButtonItem =
    [[UIBarButtonItem alloc] initWithTitle:@"Restore"
    style:UIBarButtonItemStyleBordered
    target:self action:@selector(restoreTapped:)];

// 새로운 메소드 추가
- (void)restoreTapped:(id)sender {
    [[RageIAPHelper sharedInstance] restoreCompletedTransactions];
}
이제 기기에서 앱을 삭제하고 재설치해 보자. 앱을 삭제함으로서 모든 NSUserDefaults가 제거되었기 때문에 체크표시에 대한 정보는 더 이상 존재하지 않는다.
Restore 버튼을 탭하고 몇 분 정도 기다리면 구매항목이 복원되어 체크표시로 다시 보일 것이다. 나쁘진 않다.
이제 어디로 갈까?
여기, 재사용가능한 인앱구매 헬퍼 클래스를 포함하여, 본 튜토리얼에서 우리가 개발한 코드들이 있는 프로젝트 소스가 있다.
위에서 제안했듯이 여러분이 내킨다면 코믹을 보여주는 기능을 추가하기 바란다.
인앱구매에 대해 좀 더 배우기를 원한다면, 우리의 새로운 책 iOS 6 튜토리얼를 참고하기 바란다. 아래의 내용을 다루는 2개의 챕터로 구성되어 있다.
Learn all about in-app purchases in iOS 6 by Tutorials!
- iOS 6 Hosted Downloads: 애플서버를 이용하여 다운로드를 제공하는 방법을 배운다.
- 서버기반 시스템: 앱 업데이트없이 여러분의 서버를 통해 인앱구매항목을 추가하는 법을 배운다.
- 영수증 확인: 서버나 앱에서 영수증 유효성을 확인하는 방법을 배운다.
- SKStoreProductViewController: iOS 6의 새로운 메소드를 이용해 앱안의 아이튠즈스토어에서 아이템을 파는 법을 배운다.
- iTunes Search API: iTunes Search API를 이용하여 스토어에 표시되는 아이템을 동적으로 검색하는 방법을 배운다.
- 다운로드 진행 표시: 다운로드 진행상황과 상태 표시와 사용자를 위한 좋은 구조의 구매 흐름에 대해 배운다.
보다 더 많은 것을 익히려면 iOS 6 튜토리얼을 유심히 살펴 보라. 본 튜토리얼에 관해 질문이나 의견은 포럼을 이용하기 바란다.
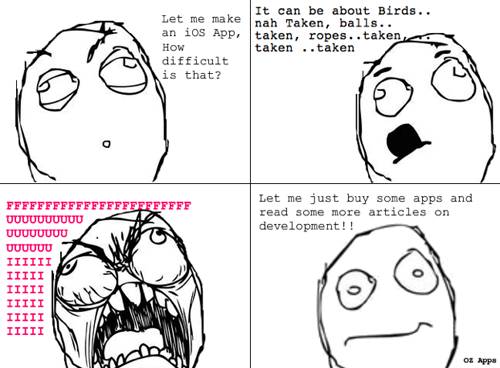
끝으로 Jayant C Varma이 작성한 훌륭한 iOS 앱에 관한 rage comic을 소개한다. :]
본 포스팅은 독립 소프트웨어 개발자이고 게이머이면서 사이트 관리자인 Ray Wenderlich에 의해 작성되었습니다.
본 튜토리얼의 한글 번역은 Wizsoft의 대표이면서 OS X와 iOS 개발자로 일하고 있는 장영준(@istsest)에 의해 작성되었습니다.
[출처] http://www.raywenderlich.com/21081/introduction-to-in-app-purchases-in-ios-6-tutorial
 [ios] 커스텀 폰트 사용하기 (Custom Fonts)


